
Gluing a knife handle is a delicate task that requires some expertise to ensure the knife will be sturdy and safe to use.
When you venture into the world of knife making, questions keep popping up. This article will address the best choice of adhesive for a knife handle and provide you with helpful tips for successful bonding. Since many people argue about this topic, I decided to analyze both sides and give you the best possible answer.
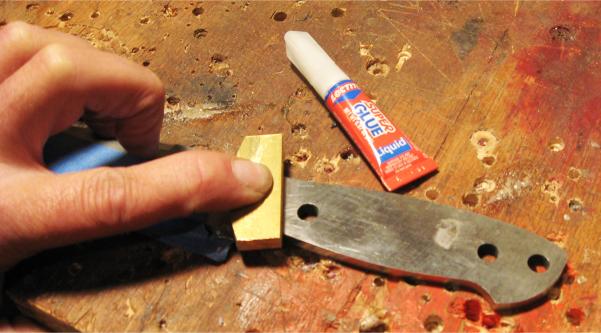
Epoxy is generally considered the best choice of adhesive for a knife handle. Epoxy is an adhesive and usually comes in two parts, known as resin and hardener. Mixing these two components provides excellent bonding properties to secure the handle to the blade tang.
Different Knife Handle Attachment Techniques :
There are several techniques for attaching a knife handle, each with its own advantages and disadvantages. The first technique involves using epoxy glue, which is a very strong two-part adhesive that offers excellent adhesion. This method is recommended for knife handles made of wood, horn, or bone. Another popular method is using cyanoacrylate glue, also known as Superglue. This glue is easy to apply and dries quickly, but it may be less durable than epoxy glue. A third technique is using a screw to secure the knife handle to the blade, which provides a strong grip but may require DIY skills. Finally, some people prefer to use rivets to attach the knife handle to the blade, which provides a professional and durable finish but may require specific tools for installation. It’s important to choose the technique that best suits your knife and DIY skills to achieve a strong and lasting result.
What is the Best Glue for Knife Handles ?
Choosing the right glue for your knife handle is crucial. The last thing you want is for the handle to slip or break while you’re using it.
Ask any knifemaker, and they will tell you that epoxies are the best glues for knife handles.
But before gluing, proper preparation is essential.
Preparing the Knife Handle Surface :
Surface preparation is key to success, regardless of the glue you use.
- Degrease with water and soap or acetone.
- Dry with a paper towel.
- Scuff the surfaces where you will apply epoxy. Using a product like Scotch-Brite is ideal for this.
- By making the surfaces less smooth, adhesion will be improved.
What is the Best Epoxy Glue for a Knife Handle ?
Now, let’s learn more about epoxy, its use in knife making, and provide some gluing tips for you to do it right.
Pot life refers to the time it takes for a mixed viscosity to double or quadruple, depending on the product’s viscosity level. The time starts from the moment of mixing and is measured at room temperature. Another way to define it is the time during which the mixed epoxy can sit before it becomes unusable.
On the other hand, working life refers to the duration during which epoxy remains low in viscosity and can still be used for a certain application. One could also say that working life is the time during which the mixed epoxy can stay in a joint before it becomes unusable. Many people think these two concepts are the same, but they are not.
As you may already know, the chemical reaction between resin and hardener generates heat that accelerates the curing of epoxy. So, when epoxy is in a mixing cup, it becomes gummy and unworkable much faster than when it is spread out.
Additionally, every knifemaker should be aware of epoxy curing time, which typically depends on the temperature. Most manufacturers specify 70 degrees for their curing times, so if your room temperature is lower, the epoxy will take longer to cure.
Another point to mention is that epoxy degrades over time. If you leave epoxy on the shelf for months and months, there’s a chance it won’t cure as hard or as fast as it’s supposed to.
This was my issue at the beginning. I often wondered how long it sat there, and when I used it, I realized I had to throw it away. So, if you’re not sure about the duration you’ve had an epoxy, discard it and get a new one.
Some epoxies cure very hard but tend to be brittle. Again, formulations vary. I recommend checking the manufacturer’s data sheet. Just because an epoxy is rated for a particular strength doesn’t mean it will be strong in all applications. Furthermore, hardness increases shear strength, while flexibility increases impact resistance and peel strength.
One of the most important things to understand is that surface preparation is key to success, no matter which epoxy is used.
For a beginner knifemaker, starting to work with epoxy may seem a bit expensive, but believe me, using cheap glue for a knife handle is even more expensive as it can ruin your hard work. Note that some epoxies may contain chemicals that are harmful to health. If your material does not cure completely or is difficult to mix, these solvents can evaporate.
How to Attach a Knife Handle Using Epoxy ?
To finish, I’d like to give you some tips on epoxy bonding. After all, it’s best to learn from other people’s mistakes. So here are several tips to keep in mind when working with epoxy:
- The number one tip, and also the most important, is to clean the surface thoroughly before using any glue, not just epoxy. You can do this with acetone or water and soap.
- After cleaning the surface, DO NOT TOUCH IT.
- Scuff the surface you’re going to epoxy. This increases the surface area and also gives more of a 3D surface for epoxy to grip onto.
- Glue as soon as possible after preparing the surface. The longer you wait, the more chance there is for dust or oxidation to settle on the surface.
- Always follow the manufacturer’s recommendations regarding the mixing ratios between resin and hardener.
- Don’t tighten too hard, as you might squeeze epoxy out of a joint.
How to Maintain and Protect Your Knife Handle After Gluing ?
After gluing your knife handle, it’s important to take care of your knife to prolong its lifespan. First, avoid soaking your knife in water or putting it in the dishwasher, as this can damage the glue and the handle. Clean the knife with a damp cloth and mild soap, then dry it thoroughly. It’s also recommended to treat your knife handle with food-grade oil to protect it from moisture and dirt. You can apply the oil with a clean cloth by gently massaging the handle. Let the oil penetrate for a few minutes, then wipe off the excess with a dry cloth. It’s also important to store your knife in a dry and safe place, away from moisture and heat. By following these simple tips, you can maintain the beauty and functionality of your knife for years to come.